Nearly all of Virginia’s soybean acres are planted no-till. Therefore, most of you are experts at getting a good stand even in heavy residue. Still, a quick review of the principles of no-till planting is always helpful. This can be boiled down to three simple steps: 1) Cut the residue; 2) Penetrate the soil to the proper depth; and 3) Insure good soil-to-seed contact. Some may add a fourth step – close the seed-V, but I consider that part of step 3. For more information, see VCE publication 442-457, Planter Drill Considerations for Conservation Tillage Systems, which can be found at the VCE web site, http://pubs.ext.vt.edu/442/442-457/442-457.html.
1. Cut the Residue. In order to cut the residue, it first needs to be spread uniformly over the field. This begins with harvest of the previous crop. Residue cannot be cut adequately when residue levels are piled in one place. Furthermore, disk openers don’t really cut through piles of chaff; instead, it is tilled into the soil, which hinders the third step of insuring good soil (not chaff)-to-seed contact. Chaff in the seed zone will only pull moisture away from the seed.
Standing residue is easier to plant through than mowed/shredded residue. So, don’t shred stalks and consider stripper headers for small grains.
Allow the residue to dry and become crisp before planting. Planting too early in the morning is one of the biggest mistakes made. Regardless if the planter is set right or not, cutting wet or tough residue is a challenge that might not be overcome. Remember, 75% of soybean yield is established when you put the seed into the ground. Don’t get in a big hurry. Allow the residue to dry.
This should go without saying and I rarely see this being done in Virginia. But, never burn the straw! This is a valuable resource. Burning will remove any nitrogen and carbon and send it up into the air. This adds to pollution and throws away probably the two most important resources for producing a good crop and improving soil quality.
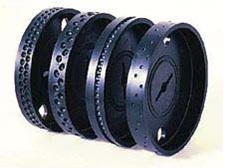
Once the residue is spread evenly, we can then turn our attention to the planter or drill. First, adjust the disk openers. Coulters and disk openers should be sharp, have a diameter large enough to create a “scissoring” action between the blade and ground, and not be bent or damaged.
Double-disk openers should be set to work together with little to no gaps between disks. Maintain approximately 1 to 1½ inch of contact between the two disks. If this blade-to-blade contact cannot be maintained, if blade diameter is worn below the manufacturer’s recommendations, or if the blade edge is bent, chipped, or jagged, the blade should be replaced. Watch the leading edge of offset double-disk openers for significant wear and bending. Essentially, the leading edge of the disk takes the abrasion and wear of cutting straw or stalks and penetration the soil. Gradual wear leads to a bigger gap between the double-disks. If the gap becomes too big or the leading disk edge becomes bent, the disks will push residue into the furrow instead of cutting through it. For offset double-disk openers, a business card-width gap should be maintained to insure proper operation and prevent the trailing disk from cutting into the leading disk blade.
Once insuring that the disk openers can do the job, the next thing to bring your attention to is adequate down pressure. This is not the same thing as weight. We can add weight later. Down pressure is controlled by the springs or hydraulics on the planter. It’s the amount of downward pressure being applied by each planting unit.  Although adequate down pressure is most related to step 2 – disk openers must penetrate to the proper depth to adequately cut the residue – practices and adjustments within each step may overlap. The coulters and/or disk openers must act like a pair of scissors. The drawing to the right illustrates this concept. The dashed line represents the soil surface and the solid line represents the angle between the coulter and soil. Note that the coulter is running at the proper depth and the contact angle is about 45O. At this angle, the cutting is scissor-like and residue will be cut. Keep in mind that the size of the coulter will affect this angle; bigger is usually better.
Although not necessary, coulters can be added in front of the planter openers to ensure residue cutting. Like disk openers, the cutting angle must be correct. All the same principles mentioned thus far and in step 2 apply. Because coulters are usually mounted several feet in front of the seed opening/placement device (in the case of coulter caddies even further), many use wide-fluted coulters. A pivoting hitch or a steering mechanism will keep the seed openers tracking in the coulter slots.
2. Penetrate the Soil to the Proper Depth. The primary differences between conventional planter/drill systems and those designed for conservation tillage systems are down-pressure and weight. Since openers and soil engaging devices must deliver more down pressure to penetrate firmer no-till soils and cut the residue, conservation planter/drill systems include heavy-duty down-pressure devices, are built heavier, and have the ability to carry much more weight than conventional tillage systems. Penetrating the soil to the proper depth may require up to 500 pounds of down-pressure per planting unit. Down-pressure springs are adjustable and multiple springs can be added if insufficient pressure is achieved. Hydraulic down-pressure controls are also available. Only after adequate down-pressure is achieved are we ready to add weight to the planter/drill. Adding weight by itself will not ensure penetration to the proper seeding depth. Add sufficient weight to the planter to ensure penetration of the coulters and seed furrow openers into untilled soil, and to keep the seed-metering drive wheels on the ground.
Soil type affects planting depth. The planter/drill will tend to sink and begin dragging up residue if it moves out of heavier soil into a lighter soil, if the planter moves from a no-till to a tilled area, or if the planter moves from compacted land to that which is not compacted. The result is that the coulters move too deep and begin pushing, instead of cutting, the residue. Never set the planter on the field edges where the soil is more likely to be compacted or in an unrepresentative soil. Wide gauge wheels, drill units that do not run side-by-side but are offset, and high clearance will reduce residue dragging when in a field with highly-variable soil types
.
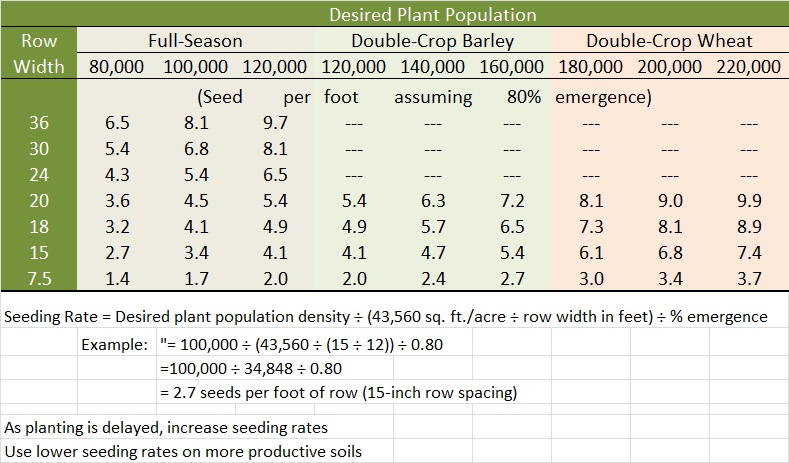
3. Insure Good Soil-to-Seed Contact. Good soil-to-seed contact cannot be achieved unless the first two steps are performed correctly. If the first two steps were carried out correctly, the last step will be much easier. There are two methods for seed-depth control on most no-till planter/drill systems: 1) setting the depth from a gauge wheel adjacent to the seed furrow device or 2) adjusting press wheel pressure behind the seed furrow openers. The disadvantage of any system using the press wheel for depth control is its distance from the seed opener. As the distance increases there is a greater possibility that irregular terrain will influence both depth control and the press wheel’s ability to provide good soil-to- seed contact. Depth control from an adjacent gage wheel is preferred. In either case, keep adequate pressure on the gauge or press wheel to force the openers into the soil to the proper depth. For more detailed discussion on the advantages of different types of press wheels (i.e., flat, ribbed, angled, etc.), see VCE publication 442-457 referenced earlier.
Sufficient weight must remain on the press wheels to ensure firming of the seed into the soil. Wet soil is easily compacted and care must be taken not to over pack the soil, making it difficult for seedling roots to penetrate the soil. In dry soil conditions, extra closing force may be needed. The key is to evaluate seed-to-soil contact, not just closing the top of the seed-V. As long as the contact is maintained, something as simple as a harrow that acts to close the top of the V and pull light residue cover back over the V may be all that is needed. This is a common practice on drills that use a narrow press wheel.
These three principles will make you successful at no-tilling soybeans, or any crop for that matter.